
JigsawDesigner Help
Edit Puzzle Geometry with Vector Tools
Choose a tool to see its real toolbar button, the gesture and the finished result. Keyboard shortcuts refer to the Mac editor.
Eight tools, shown in action
Choose a numbered tool to compare real App states before and after an action. Enlarge any screenshot to inspect the details.

Import existing SVG files to use as puzzle boundaries or design elements.
Select
Click the rectangle to select it, then drag its edge to move the whole shape.
iPhone
Switch tools and open their options
Select an object to reveal its actions. Tap the selected Pencil tool again to adjust smoothness.
- Select
- Point editing
- Pencil
- Line
- Rectangle
- Circle
- Polygon
- Bezier
1Selection actions
Use the expanded selection bar for multi-select, select all, grouping, copying and deleting. Available actions depend on the selection.
2Pencil smoothness
Move the slider between Accurate and Smooth. The triangle shown here was drawn with the Bézier tool; it is not a Pencil stroke.
Navigate the canvas
Pan and zoom around the workspace to inspect the full contour or a small connection. Rulers and the optional grid provide scale context while you draw and edit.
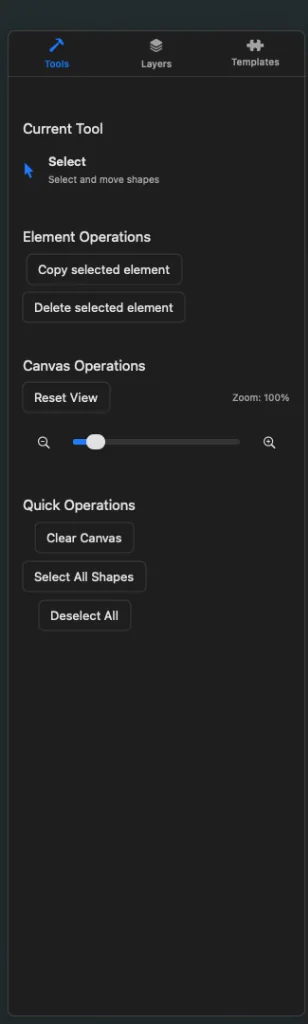
Use the Tools panel for quick actions
The Tools panel shows the active tool and keeps common selection and canvas commands close by. Use it to copy or delete the current selection, reset or zoom the view, and select or deselect shapes.
Use the expanded selection bar for multi-select, select all, grouping, copying and deleting. Available actions depend on the selection.
Open the top-left menu to create or save a project, import or export SVG, adjust zoom, or open Advanced Settings.
Select and transform document elements
Click to select an element, Shift-click to add to the selection, and use group drill-down when editing nested content. On-canvas handles resize and rotate around the selection center; Shape Info provides exact transform and geometry values.
Shape Info
View and edit the selected element's name, ID, and type (Path, Group, Circle, etc.).
Transform
Adjust position (X, Y), scale, and rotation of the selected element.
Geometry
View the element's bounding box dimensions and position.
Fill and stroke
Set a solid fill, stroke color and line width. Some complex fills and gradients are read-only.
Operations
Copy or delete the selected element with one click.
Object dimensions describe the selection, not the entire canvas. Lock proportions when you want to preserve its shape while resizing.
iPhone
Select an object to refine its properties
Select an object on the canvas, then open Properties from the bottom bar to adjust its position, size and appearance.
Transform
Adjust position (X, Y), scale, and rotation of the selected element. Object dimensions describe the selection, not the entire canvas. Lock proportions when you want to preserve its shape while resizing.
Fill and stroke
Set a solid fill, stroke color and line width. Some complex fills and gradients are read-only.
- Undo and redo command-based changes
Find the path, then refine its nodes
Generated artwork remains editable. Use the layer tree to locate a path, then adjust its anchors and handles on the canvas.
Anchors position the path
Select the path and switch to Point Edit. Drag a filled anchor to change where the path passes.
Handles shape the curve
Select a curve anchor to reveal its hollow control handles. Drag a handle to change the curve's direction and bend.
Expand groups to see nested items
Select the target path
Click a layer row to select its object. The highlighted row and canvas selection stay connected.
Lock shapes to prevent accidental edits (lock icon)
Toggle visibility to hide/show elements (eye icon)
The detailed artwork demonstrates nested layers; the simple curve makes anchors and handles easier to see. They are separate teaching examples. A parent's lock or visibility setting also affects its children.
iPhone
Find the path, then refine its nodes
Generated artwork remains editable. Use the layer tree to locate a path, then adjust its anchors and handles on the canvas.
Layers Panel
Open Layers from the bottom bar and expand Generated Jigsaw. Tap a path to select it; the controls on the right change its lock and visibility. 104 items counts children in the group, not individual puzzle pieces.
Toggle visibility to hide/show elements (eye icon)
Select the path and switch to Point Edit. Drag a filled anchor to change where the path passes. Select a curve anchor to reveal its hollow control handles. Drag a handle to change the curve's direction and bend.
Continue and join open paths
Version 1.6.0 supports smoother Pencil output and workflows for continuing or joining open contours. Inspect the join and use Point Edit when the transition needs refinement.
Understand settings by task
Customize the canvas display including grid, rulers, snap-to-grid, grid spacing, and stroke width.
Editor Settings
Pencil closure and editing distances
Language Settings
Use the system language or choose one of the app's supported languages. View your subscription status and manage your Premium membership.
Editor Settings
Pencil closure and editing distances
These distances control when a stroke closes or edits an existing path. They are measured in screen points, not millimeters.
Jigsaw Settings
Use Apply Settings to keep your changes. Complexity, edge smoothing and rendering quality are visible controls; this guide does not make unverified claims about their effects.
iPhone
Understand settings by task
Open Advanced Settings from the editor menu. Expand the relevant group to adjust editor, saving or iCloud preferences, then apply the changes.
Use Apply Settings to keep your changes. Complexity, edge smoothing and rendering quality are visible controls; this guide does not make unverified claims about their effects.
Check document-level values
Project Info contains the project name, canvas size, jigsaw parameters, document statistics, and generation controls. These values apply to the document rather than an individual selected shape.